 Cultivating Rice
in an Organic Garden
Cultivating Rice
2002, 2003, 2004, 2005 Cultivation Updates
Hi, My name is Wayne and I am an ignoramus! I have grown organic rice. If I can do it, anyone can. You may say that it's as simple as growing grass. In fact, rice is a type of grass. Very good grass!
The Grass family goes by the scientific name "Gramineae" or "Poaceae". I have no idea why the botanists of the world can't agree on a single term. Maybe they sit by the fire, late at night, puffing big Calabash pipes in deep debate.
"No, Sir Geoffrey! 'Gramineae' will never do. It just isn't civil !"
"I beg to differ, old chum. It was good enough for Professor Smithley and it's good enough for me."
Just about every location on Earth is host to several species of grass. In all, there are well over 7,000 distinct species. The Compton's Interactive Encyclopedia says "Grasses were intimately involved in the evolution of domestic animals and very likely of humans also".
I guess so! Some anthropologists think that early hominids evolved to stand upright, in order to see over the surrounding miles of grassland. That our distant ancestors lived in a huge field of grass and ate the seeds.
Of the many species, only a handful have been domesticated. They are barley, corn (maize), millet, oats, rice, rye, sorghum, wheat, sugarcane, bamboo forage, hay, pasture grasses, lawn and ornamental grasses.
All of these, including the humble lawn grass, are the product of careful selection and cultivation, over thousands of generations. As humankind has shaped their quality and their appearance, the grasses have shaped our civilizations, values, our bodies and minds. They are certainly our most important plants. And to me, the grains we eat are our most valuable natural resource.
Unfortunately, the bio-chemical industry is attempting to undo the work of our ancestors, in a single generation. Apparently, they feel they have the knowledge and the right to splice soil dwelling bacteria and poison resistant genes into our primary food supply. As if their university training had offered courses like Wisdom of the Ages- 101, instead of the more likely Applied Economics.
Severe damage has already been done. Especially, in the case of corn (maize). By 2001, over 30% of the U.S. commercial corn crop had been genetically altered to create a poison that kills butterflies and moths. Now, they are going after our wheat and rice.
You probably won't make a profit. You certainly won't feed the world. But, there are many good reasons for growing natural rice in your organic garden. It raises our awareness of the value of whole grains. The plants are beautiful. It is interesting. It is fun. And, speaking "gardener to gardener", you've gotta try this!
With sacks of rice lining our supermarket shelves, it may be surprising to hear that finding rice seed is, likely, the most difficult step in growing rice. The reason being, you must begin with unhulled seeds. That is, the rice grains must be enclosed in their tight, protective hull.
Food rice already has the hull removed and it will become moldy and rot before it grows. If you live in an area that grows rice, like California or the South, you may be able to find it as local agricultural bulk seed. Otherwise, you'll have to ask around.
Some health food stores stock, or can order, rice in the hull. Don't give up! Though it may not be in your area, rice seed is one of the most common commodities on the planet. But, don't wait too long. Soon, very soon, it may be difficult to find any seed at all, that is not genetically altered.
Even seed rice will fail if it is germinated incorrectly. Rather than provide options, I'll tell you exactly what I did.
Fortunately for me, a farmer friend had been working on a good way to germinate small batches of rice seedlings. He gave me two styrofoam flats with dozens of little cells for the seedlings. Kind of like a flat honeycomb. The seed flats float in water and the bottom of each cell has a small hole. You can find the floating flats at agricultural outlets.
For the starter soil, I used an 8 quart bag of Country Cottage Seed Starter. Containing Sphagnum Peat Moss, Vermiculite and Limestone (pH adjuster). I placed the soil in the styrofoam cells; filling each cell until it was level at the top. I had trouble with the starter mix falling through the holes in the bottom. You should fill the cells on a flat surface, like a driveway or sidewalk.
I had to add the starter on a flat surface, then immediately add some water, to make the starter a little sticky. It still didn�t work perfectly. When I put the first flat in the water, some of the cells didn�t absorb the water because there was no starter in the very bottom of the flat. I had to push the floating flats down a little, into the water, to get all of the cells moist.
For my water container, I used a large, 48" long x 24" wide x 18" high plastic equipment box that I usually carry in the back of my pickup truck. It has a lid to keep out the rain. It also has handles, which proved to be very useful.
I filled the box with 8 inches of luke warm water and placed the flats on the water. Here's a cross-section of the contraption:
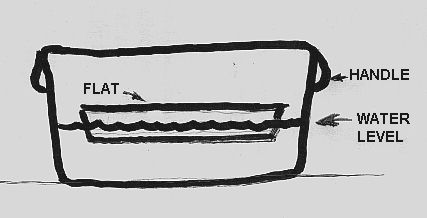
Ideally, the weather will be warm enough to keep the container outside. But, the handles enabled us to lug it inside when it was cold. I used the lid only when it was raining or on cool nights.
This year (2002) I'm using the same contraption. But, I'm also testing the little heated, covered seed flats* that you can find in any garden center. They have an electric base mat that provides warmth and peat "pill" starting pots.
* UPDATE:
Even if you live near a rice paddy, you're still going to have to figure out a way to germinate the seeds. Traditional methods involve soaking the seeds, then wrapping them in a moist sack and transferring the very tiny germinating plants into a bed of soft soil, at just the right time. Then you transfer them again, into the paddy.
This can be done in warmer locations. If you go this route, read up and please let us know of your success. I agree with you. Our method can produce 98% germination, but there is room for improvement.
The heated seed flats (Jiffy Pots) didn't work out. But, regular starter pots, with a 50% - 50% mix of peat and vermiculite, on an open tray of water, worked very well. See the 2002 updates for more information.
Synthetic containers and styrofoam flats? Maybe I'm missing the point! After all, the goal of this project is to grow natural, organic rice that isn't spliced, diced or exposed to toxins. So, why the mini-laboratory?
The first step in germination is to select the strongest seeds. Traditionally, the seeds are added to salt water and floating seeds are discarded.
The less salt, the less floaters. If you don't have many seeds, use clear water. I did and still had 99% germination.
If your rice has weevils, this is a good opportunity to find out! They don't like being immersed in water (especially salt water) and will come to the surface. If you discover weevils, put your rice seeds in the refrigerator. It won't kill them, but they will become dormant. Refrigerated storage is a good idea, in any case. If you have time, find some weevil free seeds.
You may be able to germinate the rice, even if the seeds contain weevils. But, I feel much better starting with seed that is weevil free.
Once you are satisfied with the quality of your seeds, you can plant them in the flats.
One seed was placed in each cell, then gently pressed in with a blunt dental tool (or a pencil or stick). Then I sprinkled some dry starter over the top. Covering some as deep as 1/16" and others barely at all. I don't think that rice requires light to germinate, but it may. It certainly requires light once it has emerged from the soil. And it will germinate more quickly in warm starter mix.
Rice likes warm weather and sunshine. When I was starting mine, we had some unusually cool, rainy days. On those days, I brought the container indoors (handles!) and heated it with artificial lights. I put a floating thermometer (for tropical aquariums) in the water. I never let the water temperature go below 65 degrees F. Optimally, the water temperature was around 85 degrees F.
To keep the bed warm, you can add warm water to the container. I heated spring water on the stove. On cool or rainy days, artificial lamps provide light and warmth.

8mm Movie camera light fixture on old telescope tripod. Two flood lamps & two plant lights. |

Standard heat lamp. |
Base your germination timing on your location. Rice has a fairly long growing season. The earlier it is transplanted to its final location, the sooner the heads will develop. But, too early is no good either. Plant your seeds two weeks before all danger of frost has passed. In our area (southern Ohio) May 8th is our last frost date.
As the seedlings develop, the roots will grow through the holes in the bottom of the cells and into the water. They will be ready to transplant when they are around 5" or 6" tall.
Germination time varies. I kept my plants warm and some were almost 6" tall, twelve days after planting! If you germinate your plants at lower temperatures, they will probably be fine but will take considerably longer. A good rule of thumb is, don't let the nighttime temperature go below 60 degrees F.
Choose a sunny location. Use mildly rich soil with a little compost added. I used topsoil straight from the garden, then added a few shovels of compost. Rice likes nutrient-rich soil, but is not an exceptionally heavy feeder. I would think that any soil that supports wheat or lawn grass, will also support rice. It prefers a soil pH of 5.0 to 6.5. So, in most locations, you can add compost liberally, without worrying about "overfeeding".
Depending on your annual rainfall, you can transplant the seedlings directly into the garden soil or into a paddy. The direct method requires no artificial containers and it is easier if you receive enough rain. Rice doesn't like cold water, so a garden hose is a poor substitute for rainwater. If you must water your garden planted rice, try finding a warm water source, like the faucet of a laundry sink.
For the strongest, most prolific stalks, I recommend a container with a closed bottom. We used plastic containers and a child's wading pool. I would like to try some large, galvanized containers; like the ones that farmers use to water their livestock.
Fill the containers at least 6" deep with soil. Rice has prolific roots. Mix the soil in the containers, to even the distribution and remove any large air pockets.
I had to leave town, on business, just as the seedlings were ready to plant. I was afraid that if I waited until I returned, the seedlings would be weak or dead. After all, they were growing in a small cell of peat, in a tub of water. Not much food to eat!
I did manage to plant one small container, in the morning, before I caught my plane. Sure enough, when I returned 11 days later, the seedlings in the flat had yellowed from lack of nutrients. I planted the remainder of the seedlings immediately.
A few of the plants were too weak and did not survive. But, most recovered and thrived. A good reminder that rice is a grass. And a very hardy grass, at that!
If you are transplanting directly into garden soil, make sure your soil is prepared to receive the rice, just as you would prepare the soil for any vegetable seedling. The soil should be loose and free of competing plants. Have a container of luke warm water ready.
If you are transplanting into closed bottom "mini-paddies", add water to the paddies until the water level is about 1 inch (about 2.5 cm) above the top of the soil. Use warm water or allow the filled containers to stand until the water is no longer cold.
The seedlings are transplanted by removing the flat from the water and tipping it at an angle. You may need a flat instrument, like a butter knife, to help free the soil from the surrounding walls of the cells. Be gentle when pulling the long roots through the holes in the bottom of the cells.
Remove the seedlings, one at a time. If you are direct seeding, place the seedlings in the ground, about 6" (15 cm) apart, in rows that are spaced at least 8" (20 cm) apart. Try to insert the roots naturally, so they are not balled up or crimped. Gently tamp the soil so it hugs the roots. Add warm water around each seedling, as you go. If you have the space, consider a wider distance between rows. Choose a layout that will allow you to keep the area clear of competing plants*.
*
I don't like to use the word "weeds". All plant life serves a valuable purpose in the web of life, even if it sometimes seems to interfere with our garden activities. A garden is more artificial than the plants that grow in it, whether they were intended to be there, or not. The word "weed" has come to suggest a form of life that is harmful or worthless.In fact, our garden is full of so-called "weeds" that we have purposely introduced, like Ground Ivy and Amaranth. Both of these serve to hold back more voracious garden competitors. The Amaranth is an introduced variety, from Central America, and can be used as a cooked green. The local variety of wild Ground Ivy makes an excellent garnish for Miso and vegetable soups. Both are easy to control.
If you are planting in a mini-paddy, the process is basically the same. Place each seedling's root system into the soaked soil. You can use the same 6" (15 cm) spacing but, unless your paddy is very large, you can ignore the row spacing. You'll be able to remove any competing plants by reaching in, over the side of the container.
During the next few days, some plants will probably dislodge from the wet soil and float on the surface of the water. When this happens, just push the roots back into the mud. After a week, the roots will grow into the soil and take hold.
Leave a small, unplanted area in the mini-paddy. Big enough so you'll be able to dip in a large drinking glass or small pitcher, on its side (to scoop out water, later in the season).
Once your rice is planted, it will grow. If you keep the rice clear of competing plants, the only remaining issue is water.
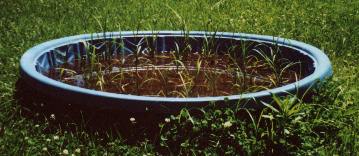
Wading pool paddy. Just planted! (Two children's pools inside one another, for structural strength.) |
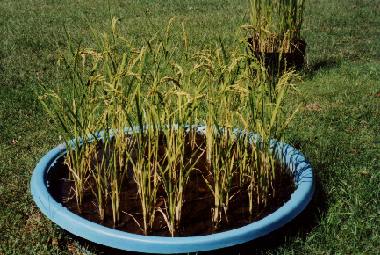
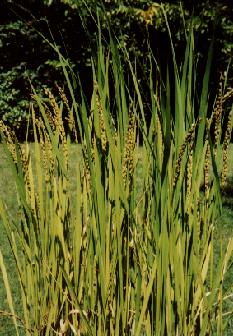
A mini paddy, about two weeks on. |
There are several specific reasons for draining a paddy. For example, to allow the sun to warm the soil around the roots; to control Tadpole Shrimp and Rice Water Weevil; to allow the heads to dry. In a mini-paddy, you'll find, both, intuitive and practical reasons for draining the paddy.
Here are two very practical reasons that are directly related to the rice's growth cycle.
It's okay to let the rain fall. Just keep your paddy reasonably dry. If you were to pick the rice heads, now, and dry them indoors, you would find that your rice is perfectly edible and capable of producing new plants in the Spring. But, it is best to allow your grain to dry beneath the sky, gathering its final nutrients from the mother stalk in natural procession. Like a child developing, full term in the womb. A strong constitution!
Beyond the practical requirements, you can use your intuition to discover other good times to drain and refill the paddy. Where do you begin?
Easy! Spend time with your paddy and watch the water.
The water will not grow stagnant as quickly as you may think. The rice has a way of keeping the water clear. In fact, we never had to drain our paddies due to cloudy water or surface scum. Occasionally, I would lower the water level and refill the paddy the following day, with warm water from a sun heated garden hose. That served to oxygenate the water.
We thought we would have to drain the water frequently, to control mosquito larvae. But, in reality, we only had to do that once, near the end of the growing season. But, that's the kind of stuff to look for. Wriggling larvae, cloudy water, or refreshment.
Can you plant your paddy, add water, and just keep the water level there, until the end of the season? Yes, you probably can! As I said, rice is very hardy. But, a careful eye on the water, the cycles and the seasons will enrich your paddy and your experience.
First, let's talk about the paddy method. Real rice paddies are not stagnant pools. Fresh water is constantly introduced into the paddy, in a controlled flow. At times, the paddy may be drained until the soil is moist, but there is no standing water.
Using the drinking glass or small pitcher, scoop out the water. When the water reaches soil level, gently depress the side and lip of the glass into the soil and continue to scoop the water until there are no puddles.
Use water from a sun heated garden hose or another warm water supply. Curl your fingers in front of the hose to keep the stream from digging into the soil. Swish the water around as it passes through your fingers, adding oxygen to the water. You can wiggle your fingers in the water, anytime you like, to keep it oxygenated.
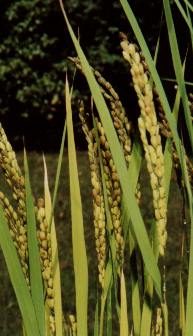
Older Variety- Heads still exhibiting upright growth. |
|
Okay, let's talk about the cultivation of rice that is planted directly in the garden soil. There are several positive aspects to this method. For example, no artificial containers, no draining and refilling, and fewer limitations on the size of your crop.
However, in our side-by-side test, using the same soil, same area and identical planting time, we found the direct planted rice to have thinner stalks, less tillers, smaller heads and a longer growing season. Having said that, the resulting grain was fully formed and, apparently as viable as its paddy grown cousins.
This year (2002) we hope to grow a larger area (approx. 30' x 5') of direct planted rice in our garden. I'll keep you posted.
We've already covered the spacing, and the control of competing plants. The remaining issue is exactly the same as for paddy grown. Water.
In 2001, our part of the planet (Southwestern Ohio) received an unusual amount of rainfall. We also provided additional water with a warm garden hose. At this time, I don't know how well the rice will do, during drought or even under average rainfall. Until I learn more, I would recommend that you don't allow your soil to become dry for extended periods. Warm water is favored, but cold water may be used; especially in the morning on a sunny day.
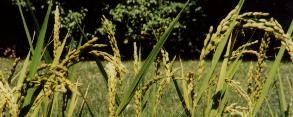
Save some of the seeds for the following year. After the heads have dried on the stem, we cut the rice at the base of the head and bring the grain into the house. As an option, you can cut the rice at the base of the stem, then gather a bundle in your arms and dance around, in the autumn sun.
On second thought, the dance is required. Not for the rice, for you!
Once indoors, let the grain dry some more, then store it. Last year, we put most of our seed in marked plastic bags and placed the bags into the refrigerator (not the freezer!). I also put some in an envelope and stored in a dark, dry area, on the shelf. The remainder was placed in vases where its graceful presence has graced our household, throughout the winter.
Oh yeah.... You can eat it too! Garden scale rice growing will not yield very much. But, you should be able to manage a cup or to. The rice hull is very tight, but small quantities can be hulled by hand. Ahhhh! Fresh garden rice!
Besides the usual garden implements, the following tools are helpful for growing rice:
For Germination:
For Planting:
For Cultivating:
For Harvesting:
Perhaps the most important advice I can share is, bring along your spirit of adventure! Many of us already understand the importance of rice and other whole grains, in our diet. I want to help you to achieve the same level of intimacy with this precious crop, in your home garden.
Rice cultivation and paddy construction provides a superb history lesson of the ingenious technology that was in use, thousands of years before the beginning of recorded history! And, looking forward, every seed that you harvest is a confirmation that the effort & wisdom of all past generations will not be lost. Not today. Not in our generation!
Through the coming months and years, genetically altered strains of rice, and many other foods, will threaten the traditional, natural source. We will be the seed savers. We will be the sheltered bay. The joy and wonder that we cultivate will travel far beyond our garden walls.
Wayne Weber is an international construction consultant, software designer and web master. To maintain some semblance of sanity (?), he writes 9 Star Ki publications, makes artwork in his little studio near Blooming Grove, Indiana, and mucks about in The Garden.
This web page will develop, over time. New information will be added as it arises. Please feel free to share your questions, comments and your own experiences with Wayne